Hardware Dialog
Selecting any per-device entry from the Hardware menu opens the Hardware Dialog for that
device. The title bar shows the hardware key (Type.Label) and the
model name of the active driver. The dialog provides two tabs:
Control (when available) and Settings, with different save
semantics — read both sections before making changes.
Below the tabs, a row of convenience controls is always visible:
Test Connection — runs the same connection check as the Communication Dialog’s per-device test. An inline status label to the right reports the outcome (green
Connectedon success, redConnection failedon failure, with the error message available as a tooltip). The button is disabled while a test is in flight.Communication Settings… — opens the Communication dialog with this device pre-selected. The Communication Dialog is non-modal; if it is already open, clicking the button raises it and switches the selection. It closes automatically when a real (non peak-up) experiment starts.
Control Tab
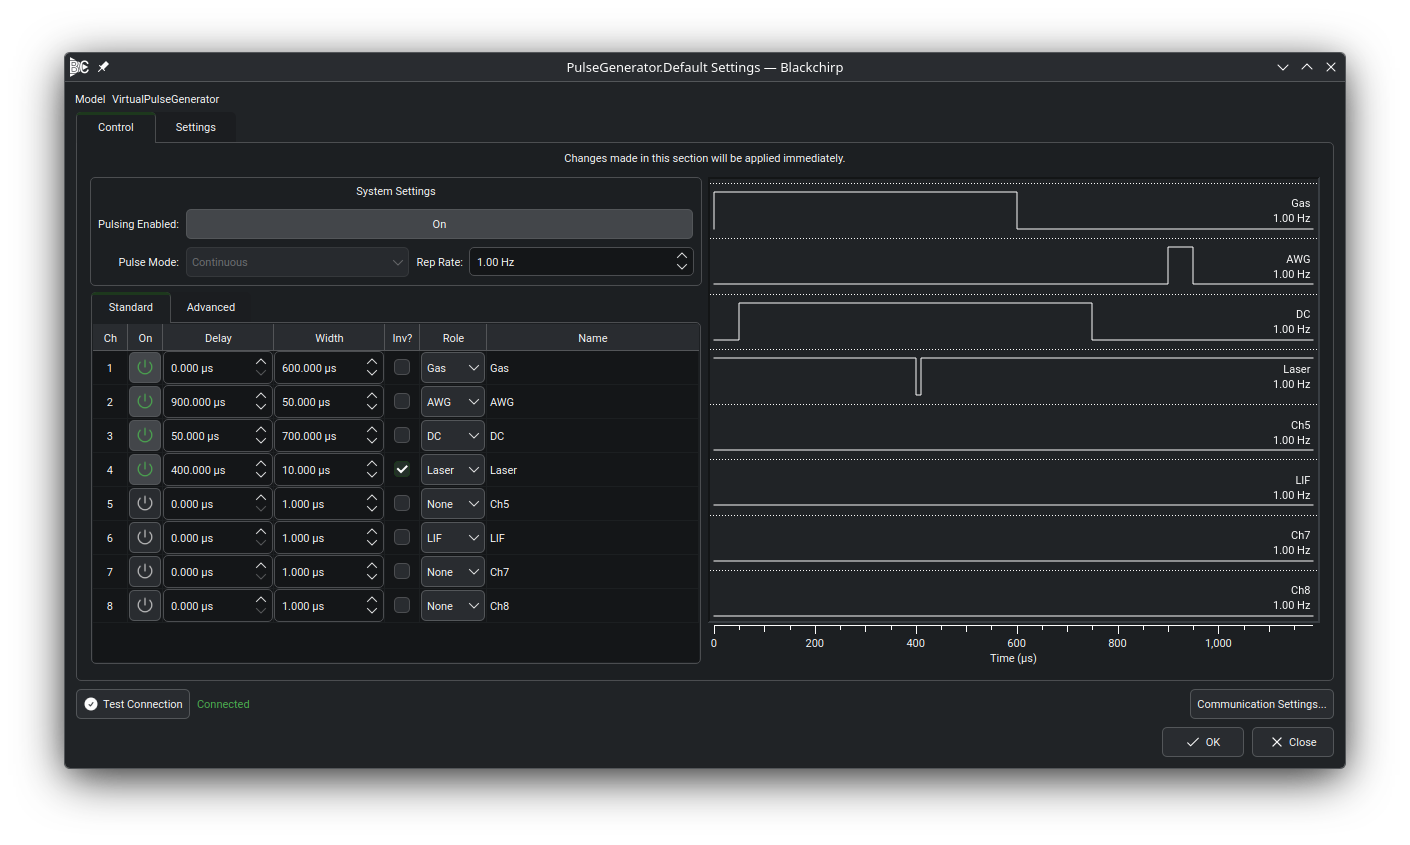
The Pulse Generator’s Control tab, illustrating the system-settings group, per-channel configuration table, and the timing-diagram pane that previews the resulting pulse train.
The Control tab is present for hardware types that expose live, interactive controls. The screenshot above shows the Pulse Generator’s Control tab; other devices follow the same pattern with controls appropriate to their function:
Pulse Generator — a System Settings group (master enable, pulse mode, global repetition rate), a Channel Configuration table (one row per channel: sync source, delay, width, mode, enable, and a cog button for advanced settings), and a timing-diagram pane that previews the pulse train.
Flow Controller — gas channel setpoints, channel names, and pressure control mode.
Pressure Controller — pressure setpoint, control mode toggle, and gate-valve open/close actions.
Temperature Controller — per-channel enable and name assignment.
Important
Control-tab changes are sent to the instrument as each value is modified. Closing the dialog with Close or X does not undo those commands. A label at the top of the tab reads: “Changes made in this section will be applied immediately.”
Settings Tab

The Hardware Dialog open on the Pulse Generator’s Settings tab. Inner sub-tabs separate the Settings group (Required + Important settings) from the Advanced group; the Advanced sub-tab is shown here.
Each device can declare any number of persistent settings, organized by priority. The Settings tab presents them through a nested set of sub-tabs:
A Settings sub-tab containing the Required and Important groups (when any are declared).
An Advanced sub-tab, shown only when the device declares advanced settings.
The screenshot above shows the Advanced sub-tab for the PulseGenerator; the Settings sub-tab would render the Required and Important groups described below.
- Required
Parameters that must be set correctly at profile creation time (for example, the number of digitizer input channels or the AWG output count). They appear in a Required Settings group on the Settings sub-tab as read-only text and cannot be changed once a profile has been created. To change a Required setting, create a new profile via Hardware Profiles.
- Important
Settings with sensible defaults that should be reviewed and confirmed. They appear in an Important Settings group on the Settings sub-tab as a two-column table (Setting | Value) with editable widgets. Typical examples include communication-level defaults, calibration constants, and operating limits.
- Advanced
Settings that rarely need to change. They appear on the Advanced sub-tab as a Setting/Value table. Array-type settings (for example, a list of available sample rates) appear as a row with an Edit button that opens a sub-dialog for adding, removing, or reordering entries; the edits are staged until the parent dialog is accepted.
Important
Settings-tab changes are written to persistent storage only when the dialog is closed with OK. Closing with Close or X discards all unsaved changes. A label at the top of the tab reads: “Changes made in this section will only be applied when this dialog is closed with the Ok button. Editing these settings incorrectly may result in unexpected behavior. Consider backing up your config file before making changes.”