Hardware Profiles
A hardware profile is a persistent record that binds three pieces of information:
Type — the hardware role (e.g.,
FtmwDigitizer,AWG,PulseGenerator,FlowController). The type categorizes which kind of hardware this profile represents.Label — a short, user-chosen name that distinguishes profiles of the same type. Labels must be unique within a type. The type and label together form the profile’s identity (
Type.label) — a stable reference that loadouts use to name the profile.Driver — the driver class that communicates with the physical instrument (e.g.,
SpinCore PB24,Spectrum M4i.44xx,Virtual AWG). The driver is fixed when the profile is created and determines which settings the profile exposes and which communication protocols are available; to use a different driver, create a new profile.
Profiles are created once and then reused across loadouts. Changing a profile’s settings affects every loadout that includes it. The overall layout of the Hardware Configuration dialog is shown on the Hardware and Library Configuration chapter page; profile work happens in its Hardware Browser and Configuration panels.
System Profiles
Blackchirp automatically creates a system profile for each required
hardware type when none exists. System profiles use the virtual label
and are backed by a virtual (no-op) driver. They satisfy Blackchirp’s
requirement that every required hardware type has at least one profile,
and they allow you to start and configure the application before physical
instruments are connected.
System profiles cannot be deleted while they are the only profile of their type. Add a real driver first, then remove the virtual profile from any loadout that no longer needs it.
Creating a Profile
Open the Hardware Configuration dialog (Hardware → Hardware Selection), select a hardware type in the Hardware Browser, then click Add Profile in the Configuration panel on the right.
The Add Profile dialog collects:
A label for the new profile (required; must be unique within the type).
The driver to use, chosen from the list of available drivers for that hardware type.
For Python-backed drivers, the path to the Python script.
The communication protocol (RS232, TCP/IP, GPIB, Custom, or Virtual), where applicable.
After selecting a driver, the dialog shows a settings widget organized into priority sections.
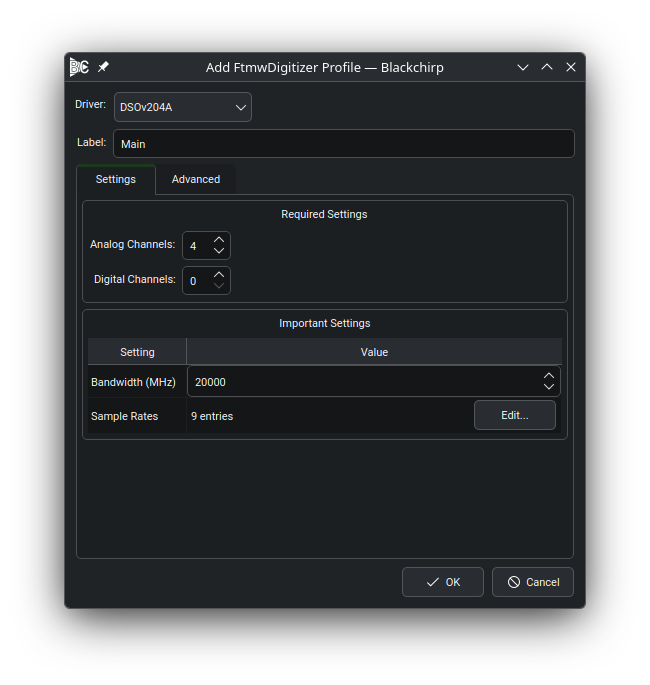
The Add Profile dialog (here shown for an FtmwDigitizer profile). The Settings tab contains the Required Settings and Important Settings sections; the Advanced tab (if present) hosts optional settings.
Settings at Creation Time
The Add Profile dialog presents the driver’s settings in the same Required / Important / Advanced priority groups described on the Hardware Dialog page. Two behaviors are specific to creation:
All groups, including Required, are editable. After the dialog is accepted, Required fields become read-only; changing them requires deleting and recreating the profile.
All settings are written to the Blackchirp configuration file before the hardware object is constructed, so the device starts with the chosen values even before it has been connected.
Editing Profile Settings After Creation
Open Hardware → [Device Name] from the menu bar to reach the Hardware Dialog for a device. Its Settings tab hosts the same settings widget used at creation time, with Required settings now read-only and Important / Optional settings still editable.
Enabling and Disabling Profiles
Within the Configuration panel of the Hardware Configuration dialog, each profile in the list has an Enable checkbox. Disabling a profile removes it from the active loadout’s hardware map without deleting the profile. The profile’s settings are preserved and it can be re-enabled at any time.
Some hardware types are single-instance: only one profile of that type may be active in a loadout simultaneously. These are FTMW Digitizer, AWG, LIF Digitizer, and LIF Laser. Enabling a second profile of a single-instance type automatically disables the first.
All other hardware types are multi-instance: you may enable several profiles of the same type at the same time (for example, multiple flow controllers or pulse generators).
Deleting a Profile
Select the profile in the Configuration panel and click Remove Profile. Blackchirp asks for confirmation before deleting. A profile that is the sole profile of its type in any loadout cannot be deleted until an alternative is added.